|
 Posted: August 10, 2003 Posted: August 10, 2003
Author: Matt Bunnell
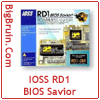
Manufacturer: IOSS
Source: HighSpeed PC
Background: Who is IOSS (Information One Stop Service)?
Their web site states: IOSS International was established in 1996, located in Taipei, Taiwan R.O.C. and is the worldwide leader in Unique PC Equipment targeting enthusiastic PC users today. Our ultimate goal is to provide PC users with simple and easy steps to upgrade and maximize their PC performance with the least cost possible.
Along with the RD1 BIOS Savior provided by HighSpeed PC for this review, IOSS also produces the following items for the PC enthusiast:
4RD2 PC Geiger is a PCI Bus performance monitoring kit.
4RD3 Gladiator is a round IDE cable.
4RD3XP Gladiator is a shielded round IDE cable.
4They also make USB storage media, USB card readers and Server modules.
Today we take a look at the RD1 BIOS Savior. This device allows you to safely flash your BIOS virtually without fear of failure. With this device you can update your BIOS to gain added functionality and stability for your motherboard, switch between two similar BIOS versions (one stock and one overclocked). You can even repair a friends BIOS chip (provided its the same type as yours).
The BIOS Savior came packaged in a small colorful box, the back showing the different versions available.
 
Inside, everything was enclosed in an antistatic bag with all you need to install your BIOS Savior. Included is a 20 page (English) manual, ROM extractor, Switch cable, mounting bracket, Decal for your case and of course the BIOS Savior module.
 
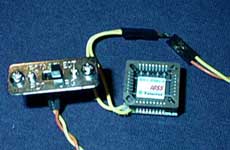
The pictures below show the module & switch (left) and a side shot of the module (right) that will add about 7 mm in height to the original chip socket.
 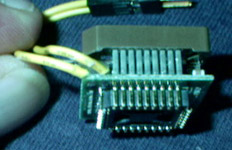
Anyone that has flashed BIOS before will have no problem installing and using this device, however, it is VERY important to note the orientation (one corner is notched) on the original BIOS chip. This orientation MUST be carried thru with the BIOS Savior. Failure to do so can result in damage to the BIOS chip, the BIOS Savior and even the motherboard.
The first thing is to locate the BIOS chip on your motherboard (below left) and note the orientation. Then, using the extractor tool, remove the chip being careful not to bend the pins on the chip. Next, insert the BIOS Savior into the empty socket (below right). Make sure you have the correct orientation to prevent damage.
 
Here it is installed on my ASUS A7N8X-Deluxe:

While it is not my intention to give step by step instructions on how to flash your BIOS (instructions can be found elsewhere on the internet). Using the BIOS Savior is very simple following the instruction manual. Once you have it installed, Boot up as you normally would, flip the switch to RD 1, and flash the BIOS Savior. You are now good to go! Though most PC enthusiasts prefer to flash the BIOS using DOS, this unit will also work with the ASUS Live Update utility and Gigabytes @BIOS utility which work in the Windows environment.
Normally I run the 1004 uber BIOS (modified by Demoulous @ nForcersHQ ), so I downloaded his 1005 uber BIOS to see how it runs on my motherboard. Below you see screen shots of AIDA 32 system information tool (showing the two BIOSes).
 
Now that I have the IOSS BIOS Savior installed in my system, I have peace of mind that, should I run into any problems next time I flash the BIOS, Im protected. But this safety net extends into the realm of virus protection also! If my system contracts a virus that attacks the BIOS, Im still able to start my computer with the 2nd BIOS. The circuitry of the BIOS Savior and the BIOS ROM do not have access to each other, preventing any cross contamination.
Final Words: Having installed it in my system now, I wonder why I didnt get this little gem sooner. I would not hesitate recommending this to anyone. At $24.99, the safety net this device adds to your system is a great value!
Pros:
4Inexpensive
4Peace of mind
4Ease of use
Cons:
4Only one: As stated on the box, "This product is intended to be professionally installed". Having said that, anyone that has built their own system (our target audience) should have no problems installing and using this product.
Special thanks to HighSpeed PC for providing the IOSS BIOS Savior for review!
Please drop by the BigBruin.Com Forum and feel free to discuss this review.
|


