| Sunbeamtech Tuniq Tower 120 CPU Cooler - Page 3 of 4 |
Installation:
Installation on the Tuniq Tower doesn't seem difficult on paper, but the reality of it was a bit different. The first step, which can be an unwelcome one to many, is that the plastic retention mechanism on the motherboard must be removed in order to use the Tuniq's special back plate. This obviously means that the entire motherboard has to be removed from your system in order to install the cooler, which adds time and inconvenience to the process. The benefit is greater strength and security, as the cooler is bolted right through the motherboard, and isn't relying on plastic clips to hold it in place.
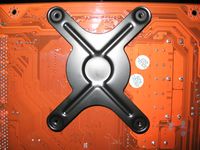
The image below shows the P4 back plate installed on a Socket 478 Abit IS7-G motherboard. There is a small adhesive pad in the middle of the plate which holds it in place once you have aligned the holes in the plate with the holes in the motherboard.
The next step was to smear a thin layer of thermal paste on the CPU. This is generally an easy step, but not so this time. The included paste was extremely gooey and would not spread evenly. It left clumps, and would cling to the plastic spreader (an old credit card) that I have used for such purposes for years. I eventually gave up on the Tuniq thermal paste and went and grabbed the rest of the paste that came with the Gigabyte G-Power Cooler Pro. The Tuniq representative insists that the thermal paste's quality is quite high and that it is supposed to be as I described, but I did not have the patience to fight with something that generally doesn't require it.
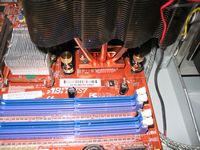
I then lowered the Tuniq Tower into place, and ran into my next problem... The base of the 120mm fan interfered with the chipset cooler on this motherboard. The temporary solution was to remove the fan from the chipset cooler (and I am still working on a mod to get it back in there). The standard (low profile) chipset cooler on this motherboard has been replaced with a Thermalright NB-1, which may be taller than average, but I have seen taller. Tuniq recommends this CPU cooler for motherboards with chipset coolers shorter than 5.5 cm, if they are in the direct vicinity of the CPU.
With the fan removed from the chipset cooler, the Tuniq Tower 120 then fit into place, and could be secured with the brass thumbscrews. Reaching under the radiator to tighten the screws was a bit tricky, and every other component in the system (VGA card, PSU, DDR) had to be removed in order to get my hands in there. Once all four screws were tightened down all the way, the cooler was in there securely. Given the size and weight, that is a very good thing!
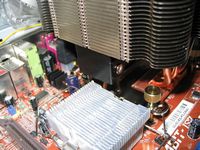
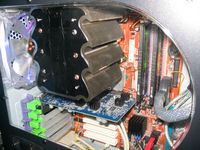
The images below show the Tuniq Tower installed, and just how far it over hangs the CPU socket. Those with large chipset coolers, or other prominent features in the area of the CPU, will want to closely evaluate their choice of such a large cooler.
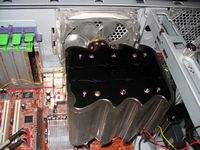
The images below show just how much room the cooler takes up in a rather large case (Thermaltake Armor)... The top of the cooler reaches almost to the windowed side panel! There is just a little over an inch between the top of the cooler and the window, and the once prominent 120mm LED exhaust fan is now almost obscured by the cooler.
Those with small/narrow cases will also want to pass on this cooler! Tuniq recommends this cooler for cases that are at least 19 cm wide. I have a mATX case I use as an HTPC, and with the cooler sitting on the table next to the case, they are about the same height! Considering the case's feet, thickness of the steel, motherboard, motherboard standoffs, and CPU, the cooler would actually stick out the top of the case! Maybe I could cut a hood scoop into the case, and make it a hot rod.
Overall, the installation wasn't the easiest I have done by any means. The issue with the thermal paste was just a little annoyance, but the size of the cooler needs consideration by anyone interested in the Tuniq Tower.
Testing:
Testing of the Tuniq Tower 120 was conducted on the system described below:
Intel Pentium 4 2.6C processor
Abit IS7-G i865PE motherboard
1024MB PC4400 XL Corsair Dual Channel DDR Kit
Thermaltake Armor tower case
Ultra Products Xconnect 500W PSU
Windows XP Professional SP2
Stock Intel cooler and Gigabyte G-Power Cooler Pro for reference
The testing will consist of two phases, where the thermal results for the Tuniq Tower will be compared to the two other coolers at both idle and load conditions. The idle condition is achieved by running the CPU at the default speed (2600 MHz), with the default CPU voltage (1.525 V), and with nothing running except for Windows sitting at the desktop. The load condition is achieved by overclocking the CPU to 3003 MHz (231 fsb x 13 multiplier), upping the CPU voltage slightly to 1.550 V, and running SiSoft Sandra Burn-In Wizard (CPU tests only) so as to keep the CPU utilization at 100% at all times.
Please read on to the next page for more... Next
Page 1 | Page 2 | Page 3 | Page 4 | Home | Forum | Review Index
|
|
|
|


